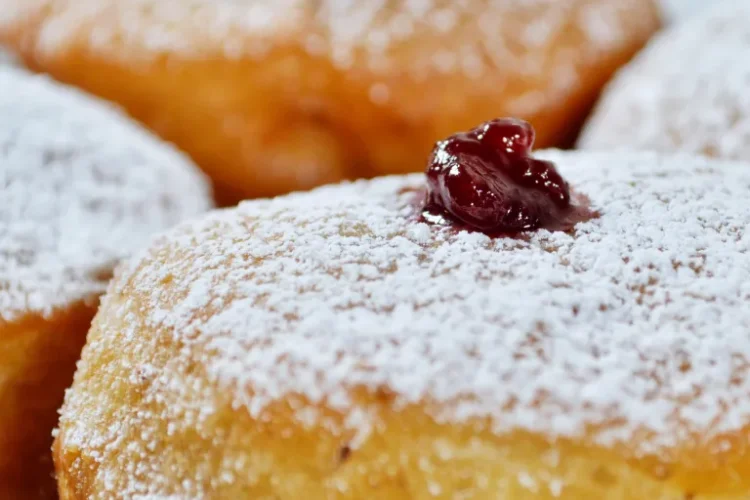
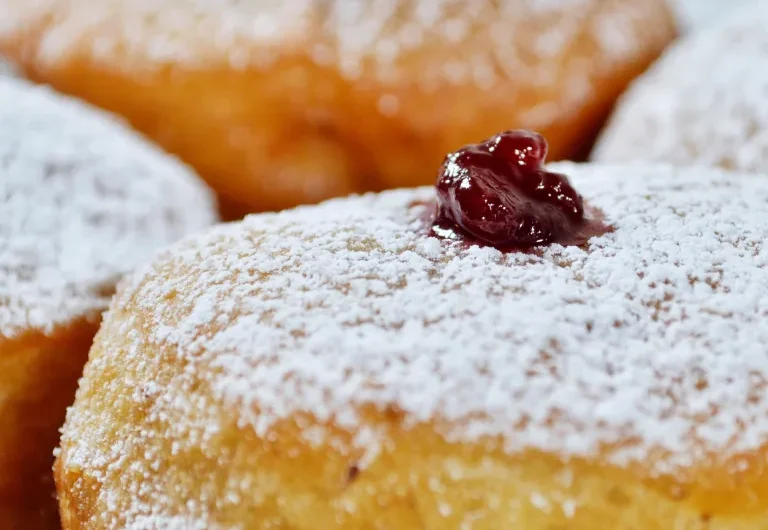
These easy-to-make sufganiyot (Jewish doughnuts) can be stuffed with your favorite fillings like jelly, chocolate spread, pudding and more. They are the perfect way to celebrate Hanukkah!
Hanukkah was THE major Jewish holiday in my family growing up. Controversial, I know! But for nearly half of my childhood, I grew up in the South, isolated from other Jewish families in general and the rest of my Jewish family that lived primarily in New York.
So, is it really that surprising that when everyone around us was making a huge deal about “the holidays” (when what they really meant was Christmas), my family got hype for Hanukkah? Plus, I was a pre-teen and teenager at the time, so of course, I was excited about presents.
But my connections to Hanukkah run deeper than getting presents. In a lot of ways, it was the one way I was Jewish at the time that didn’t feel bad. I faced a lot of anti-Jewish oppression/anti-Semitism growing up in the South. My Jewish identity was the butt of a joke or used against me or the reason I couldn’t meet my boyfriend’s extended family at the time.
When I sing the prayers for lighting the candles now, I remember how it felt to be Jewish back then and I remember how far I’ve come in understanding my identity and embracing it. And while I didn’t grow up with so many aspects of Jewish culture, I get to celebrate those aspects now because my family held on to Hanukkah back then, and one great example is sufganiyot!
What are the sufganiyot?
The sufganiyot are delicious round donuts that are typically filled with jelly, although they can be filled with lots of other things, such as chocolate spread or pudding. They are fried in oil and dusted with powdered sugar.
Donuts can seem really intimidating, and I won’t say that the process of making this isn’t at least a little laborious – there are several steps and you do have to knead the dough for about 15 minutes. But there aren’t any fancy techniques necessary to make these; you just have to be willing to put in the time and effort.
How to make them?
My biggest tips for getting these donuts right are making sure to set out your vegan milk to warm to room temperature and allow your butter to cool to room temperature before you get started. I’ve even made it a step in the recipe – that’s how important it is! If you don’t do this step. They’ll still taste good, but they won’t get as fluffy.
This recipe also uses aquafaba or the liquid that comes in a can of chickpeas. Ensuring that the aquafaba is properly beaten is essential as well. When you flip over the hand mixer, the aquafaba should form a “V” shape and should keep its form – then you’ll know you have stiff peaks. One great thing about aquafaba is that if it starts dissolving, you can always whip it back up.
After cutting my donuts with the circle cookie cutter, I place them on baking sheets lined with parchment paper. For me, this makes them easy to move around as needed and prevents them from sticking to anything.
When you’re ready to fry your donuts, be sure not to crowd your pot. I’ve generally been able to do 3-4 at a time, but depending on the size of your pot, you may be able to fit more or less. You want to make sure they have room to expand and move around in the pot. Starting out with fewer donuts and adding more as you go is an excellent way to figure out how many you can reasonably fit.
Lastly, using a skewer or chopstick to poke through to the center of your donut is a great way to make sure your jelly can easily fill the center of your donut. Finally, dust with powdered sugar before you’re ready to serve them. These donuts will last about one day in an airtight container. They are definitely best served fresh, so I recommend sharing with family, friends, or neighbors (wear your masks!!).
Sweeten up your Hanukkah with this Vegan Sufganiyot Recipe!
Easy Vegan Sufganiyot (Jewish Donuts)
Course: DessertCuisine: JewishDifficulty: Medium24
donuts20
minutes25
minutes537
kcal30
minutes1
hour15
minutesThese easy-to-make sufganiyot (Jewish doughnuts) can be stuffed with your favorite fillings like jelly, chocolate spread, pudding and more. They are the perfect way to celebrate Hanukkah!
Ingredients
2 chia eggs – made of 2 tablespoons of ground chia and 6 tablespoons of water
3 tablespoons of aquafaba – the liquid from a can of chickpeas
½ cup and 2 tablespoons of non-dairy milk – at room temp
½ cup and 1 teaspoon of non-dairy butter – melted then cooled to room temp
4 cups and 5 tablespoons of all-purpose flour
¼ cup of sugar
1 teaspoon of salt
2 teaspoons of active dry yeast
1 tablespoon of vanilla extract
6 tablespoons of water – divided in half
5 cups of vegetable oil – for frying
Fillings as desired like jelly, jam, chocolate spread, pudding, etc.
powdered sugar for dusting on top
Directions
- Set your non-dairy milk out to warm to room temperature. Melt your butter in a small saucepan and then allow it to cool to room temperature. Set both aside.
- Make your chia eggs by mixing the water and chia together and setting them aside for at least 5 minutes.
- Sift and whisk together the flour, sugar, and salt in a large bowl.
- Place the aquafaba in a bowl and mix with a hand mixer on high speed until it turns white and stiff peaks form (approximately 5-7 minutes). It can take longer depending on the shape of your bowl and how easily the mixer can beat the aquafaba.
- Sprinkle the yeast over 3 tablespoons of slightly warm water. Let it sit for 5 mins or until the yeast starts to react. Sprinkling a little bit of sugar in the mixture can help the reaction occur.
- Add the yeast mixture, chia eggs, 3 tablespoons of water, milk, butter, and vanilla extract to the dry ingredients and mix until a dough begins to form. When the mixture starts to look dough-like, add the aquafaba. If the aquafaba has gotten foamy and no longer holds stiff peaks, beat again until the peaks form and then add to the dough.
- Once a soft dough forms, knead by hand in the bowl or on a lightly floured surface for 10-15 minutes. Be generous in using flour on your hands, but the dough should remain slightly tacky.
- After kneading, return the dough to the bowl, cover and let it rise until it’s double in size. This will take approximately 30 minutes; however, the time can vary a lot depending on the temperature of your kitchen and many other factors. Try to find a warm spot in your kitchen or home to place your dough, as this can speed up the process.
- After rising, divide the dough in half. Recover the second half of the dough.
- Roll out the dough with a rolling pin to about 1/4 inch thick and use a circle cookie cutter to make the donuts. Set them aside and reroll dough as needed.
- Repeat with the other half of the dough.
- Use extra dough to make donut holes by rolling them into small balls.
- Heat the oil in a large pot. The amount of oil will depend on the size of your pot, but you’ll want at least 2.5 inches of oil.
- Heat the oil between 320-360 degrees F. It’s important to stay below 360 and above 320 while frying the donuts, so you’ll need to keep rechecking the oil temperature throughout and readjusting the dial.
- Place 2-3 donuts in at a time (depending on the size of your pot).
- Fry on one side until light golden brown, then flip and repeat. Remove the donuts from the oil and place them on a paper towel-lined plate. Repeat with all donuts and donut holes.
- Transfer donuts to a wire rack to cool. Once completely cooled, you can fill with your choice of fillings using a piping bag.
- To fill the donuts, you’ll first want to pierce through with a chopstick or skewer to the center or about 3/4 of the way through (be careful not to poke to the other side). Then use a piping bag to fill the donuts.
- Dust with powdered sugar and serve.
Notes
- The donuts are best served immediately, but can also be stored in an airtight container overnight for the next day. I recommend waiting to dust them with sugar until you’re ready to serve them.
- I filled mine with raspberry jelly and cookie butter, but the sky is the limit!


